
Das Grillen auf einem Kamado-Grill mit Keramikbeschichtung ist eine Kunst. Man investiert viel Zeit und Geld in die Auswahl des besten Briskets oder der besten Rippchen. Sich jedoch auf den Drehknopf am Deckel zu verlassen, ist riskant. Er kann das Essen innerhalb weniger Minuten verderben.
Teil 1. Die versteckten Schwächen der Temperaturanzeige Ihres Grills
Warum Ihr Standard-Kuppelthermometer ungenau ist
- Kalibrierungsabweichungen: Schon ein kleiner Stoß oder jahrelanges Stehen im Regen können die Messwerte um 20 bis 40 Grad verfälschen. Man könnte meinen, man grillt bei 250 °F (ca. 120 °C), aber der Grill ist tatsächlich viel heißer oder kälter.
- Langsame Reaktionszeit: Die Nadel bewegt sich langsam. Beim Verstellen der Luftschlitze ändert sich die Temperatur im Grill sofort. Die Anzeige reagiert jedoch verzögert.
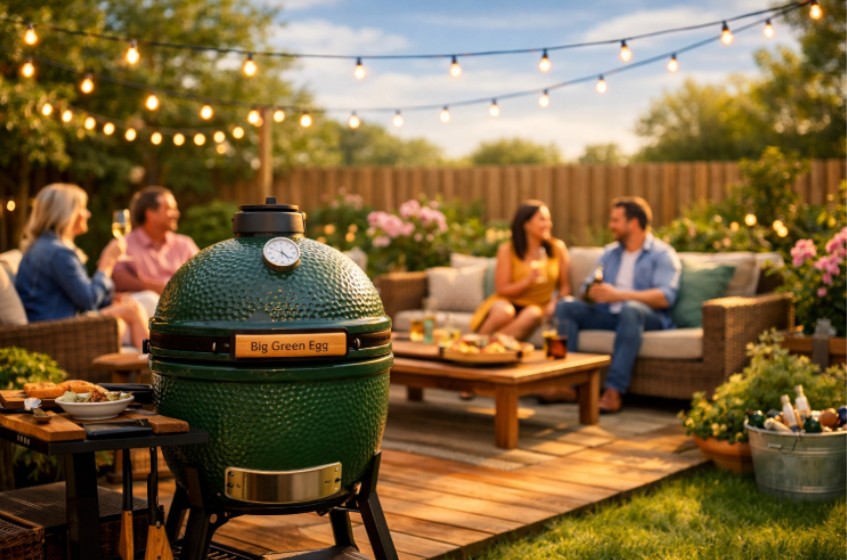
Das Ersatzthermometer für Big Green Egg löst das Problem der Temperatureinstellung beim Kochen.
Temperaturunterschiede zwischen Kuppel und Rost: Die 50°F-Differenz
- Direktes Grillen: Beim Grillen von Steaks auf einem Big Green Egg wird der Grillrost heißer, als das Thermometer anzeigt. Trotz moderater Temperaturwerte unter der Kuppel sorgt die direkte Hitze für eine schöne Kruste.
- Indirektes Rauchen: Bei Verwendung eines Hitzeschutzblechs ändert sich der Luftstrom. Heiße Luft kann sich oben an der Rauchkammer stauen, bevor sie aus der Lüftungsöffnung austritt. In diesem Fall kann die Temperaturanzeige der Rauchkammer höher sein als die des Rauchgitters.
Warum NTC-Sensoren in Keramikgrills mit hohen Temperaturen versagen
Teil 2. ProTemp S1 vs. herkömmliche Messgeräte: Eine technische Aufschlüsselung
| Besonderheit | Serienmäßiges analoges Messgerät | ProTemp S1 Digitaler Ersatz |
| Sensortyp | Bimetallspule (mechanisch) | Hochpräziser digitaler Sensor |
| Ansprechzeit | Langsam (Minuten bis zur Stabilisierung) | Sofort (Sekunden) |
| Lesbarkeit | Aus verschiedenen Winkeln schwer lesbar | Großes, hintergrundbeleuchtetes LCD-Display |
| Konnektivität | Keine (Muss am Grill stehen) | Bluetooth-/WLAN-fähig |
| Genauigkeit | +/- 20°F (Schwankt häufig) | +/- 1,8 °F (Laborkalibrierung) |
| Vielseitigkeit | Nur Kuppeltemperatur | Kuppel- und Lebensmitteltemperatur |
Teil 3. So meistern Sie die Temperaturkontrolle mit einem Ersatzthermometer für das Big Green Egg
Kabelgebundene vs. drahtlose Konnektivität
- Sicherheit: Sie erhalten sofort eine Warnung, wenn ein Fettbrand die Temperatur sprunghaft ansteigen lässt.
- Konstanz: Sie merken sofort, wenn die Holzkohle zur Neige geht und die Temperatur sinkt.
- Komfort: Sie können das Spielgeschehen im Blick behalten, während Sie sich das Spiel im Inneren ansehen.
Genauigkeit der Temperatursonde
- Umgebungsfühler: Befestigen Sie diesen am Edelstahlrost. Halten Sie ihn mindestens fünf Zentimeter vom kalten Fleisch entfernt. Achten Sie außerdem darauf, dass er nicht in die Nähe von offenen Flammen gelangt.
- Fleischthermometer: Führen Sie es in die dickste und tiefste Stelle des Fleischstücks ein. Vermeiden Sie Bereiche mit Knochen oder Fettansammlungen. Diese Stellen leiten die Wärme anders, was zu falschen Messwerten führen kann.
Robustheit in Profiqualität
So meistern Sie die Temperaturkontrolle an einem Ersatzthermometer für das Big Green Egg.
Teil 4. Schritt für Schritt: Installation des ProTemp S1 Digitalthermometers (Ersatzteil)
Schritt 1: Auspacken
Schritt 2: Das Gerät einrichten
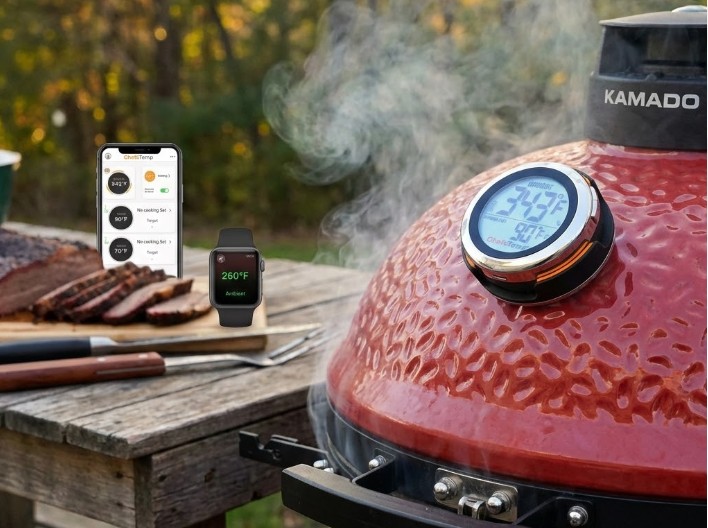
- Akkulaufzeit: Im WLAN-Betrieb hält der Akku 20 Stunden. Im Bluetooth-Betrieb beträgt die Laufzeit bis zu 300 Stunden.
- App-Verbindung: Laden Sie die Software jetzt herunter. Koppeln Sie das große grüne Funkthermometer mit Ihrem Smartphone.
- Einstellungen: Wählen Sie Ihre Temperatureinheit (°F oder °C).
Schritt 3: Installieren Sie den ProTemp S1 auf dem Grill
- Altes Messgerät entfernen: Schauen Sie in die Kuppel. Suchen Sie die Klammer, die das alte Thermometer hält. Drücken Sie sie zusammen und schieben Sie das Messgerät von vorne heraus.
- Reinigen Sie das Loch: Mit der Zeit sammeln sich Ruß und Fett an. Wischen Sie den Bereich um das Loch herum sauber.
- Neue Einheit einsetzen: Schieben Sie den ProTemp S1-Stiel von außen durch die Öffnung.
- Sicher befestigen: Schieben Sie von innen die Klemme oder die Silikonscheibe auf den Stiel. Drücken Sie sie fest gegen die Wand. Dadurch entsteht eine Abdichtung. Der Rauch bleibt drinnen, wo er hingehört.
- Richten Sie das Display aus: Drehen Sie den Bildschirm, bis er genau waagerecht ist.
Schritt 4: Starten Sie den Kochvorgang
- Überwachen Sie die Temperatur: Achten Sie auf die Digitalanzeige. Sie reagiert wesentlich schneller als das alte Nadelmessgerät.
- Lüftungsschlitze einstellen: Um Ihren unteren Lüftungsschlitz präzise einzustellen, verwenden Sie diese Kurzanleitung.
- Zusätzliche Sonden: Wenn Sie die Temperatur von Lebensmitteln überprüfen möchten, laden Sie die zusätzlichen Sonden auf. Koppeln Sie diese in der App unter "Sonden hinzufügen"."
- Hitzebeständigkeit: Die Sonden vertragen intern Temperaturen bis zu 100 °C. Die maximale Umgebungstemperatur beträgt 350 °C.
- Sicherheitshinweis: Tragen Sie immer Handschuhe. Die Sensoren werden heiß. Reinigen Sie sie nach Gebrauch vorsichtig.
Teil 5. Unverzichtbares Kamado-Zubehör für 12-stündiges Niedrigtemperaturgaren
1. Hitzeschutzbleche
- Warum Sie es brauchen: Es ist unerlässlich für indirektes Garen. Sie können damit Brot backen oder Rippchen räuchern.
- Das Risiko: Ohne diese Schutzschicht trifft die Strahlungshitze direkt auf das Fleisch. Der Boden verbrennt, bevor das Innere gar ist.
2. Holzkohlekörbe
- Bessere Luft: Es verhindert, dass Asche die Lufteinlasslöcher verstopft.
- Schnellere Reinigung: Sie können den Korb herausnehmen, die kalte Asche ausschütteln und dann in Sekundenschnelle frische Kohle nachfüllen.
3. Luftstromwerkzeuge
4. Kabellose Fleischthermometer-Sonden
Ersatz-Kuppelthermometer für Big Green Egg und weiteres Zubehör für die schnelle Küche.
Teil 6. Schlussfolgerung
Teil 7. Häufig gestellte Fragen zum Austausch des Big Green Egg Thermometers
Frage 1: Ist der ProTemp S1 wasserdicht genug für die ganzjährige Lagerung im Freien?
Frage 2: Wie oft muss ich den ProTemp S1 kalibrieren?
Frage 3: Was ist die maximale Temperatur, die die ProTemp S1-Sonde verarbeiten kann?
Frage 4: Kann ich mit dem ProTemp S1 mehrere Fleischstücke gleichzeitig überwachen?
Frage 5: Passt der ProTemp S1 auch auf andere Kamado-Grills außer dem Big Green Egg?
Frage 6: Wie groß ist die Bluetooth-Reichweite für die drahtlose Verbindung?
Frage 7: Warum weicht der Messwert meiner digitalen Kuppel von dem meiner Gittersonde ab?

Steaks are not your everyday meal. They are the most costly cuts of meat you can order at a restaurant of any size. Some people only order steak during a ceremony or a special occasion. The only way to eat steak regularly is to learn how to cook it at home. Buy the best Weber grill, tongs, spatulas, meat thermometer, and other essential grilling tools. Next, find a steak temperature guide to use when cooking.
After that, gather more knowledge and facts about grilling steak. If you have some grilling experience, then barbecuing steak should be manageable. If you are a novice, you are in a learning phase. We will reveal the things most professional chefs want you to know when cooking steak.
A steak temperature chart guide
It is necessary to keep a steak doneness temperature chart close to you when cooking steak. It will serve as your reference point when reading the steak’s internal temperature. A temperature chart is a guide showing the safest doneness temperatures for steaks. Any chef will follow the standard system of doneness when cooking steak. They will ask you how you would like your steak cooked before working on it.
Follow the same rule at home. Find out from your family or friends about how they would like you to cook their favorite steak. Then keep your best instant-read meat thermometer nearby to measure internal temperatures accurately. The standard steak doneness temperature chart appears next:
- Selten – 120 to 129 degrees F or 49 to 54 degrees C
- Medium Rare –130 to 134 degrees F or 55 to 57 degrees C
- Medium – 135 to 144 degrees F or 58 to 62 degrees C
- Medium Well – 145 to 154 degrees F or 63 to 67 degrees C
- Well Done – 155 to 144 degrees F or 68 to 73 degrees C
When assessing doneness, chefs focus on temperature rather than color. Color is not an adequate indicator of doneness. Instead, use an electronic Fleischthermometer to gauge the internal temperature. Using the information in the chart above, you can cook the following steaks.

- Rare Steak– Some meat lovers like to eat their steak raw or nearly raw. When asked to cook a Rare Steak, ensure the middle is slightly past rare. The center will be pure red and cool. As it is undercooked, the steak might smell like blood (iron).
- Medium Rare Steak – The above steak temperature chart shows that the correct internal temperature for Medium Rare is 130 to 134 degrees F. It will have a warm and red center when you maintain this temperature range. The steak will have an attractive texture and succulence.
- Medium Steak – You will know when you have achieved the best doneness level when the center turns pink and stays warm. While a Medium Steak may appear juicy when cut, it will be firmer and chewier. The juices will settle on your meat plate.
- Mittelgroß– When you cook steak at a temperature range of 145 to 154 degrees F, it will substantially change. The protein fibers in its muscles will shrink due to heat. This will cause the whole steak to lose volume and develop some pink tinges in the middle. Medium Well steak is not juicy, even when you cut it. The heat dries the juices completely.
- Well-Done Steak– Protein fibers break down completely when exposed to heat. So the natural juices in meat will drain in the process. Well-done steak is not tender because it has no moisture. So you cannot fully enjoy the flavor of your favorite meat. All in all, Well-Done steak is the safest to eat because the higher internal temperatures kill all pathogens. As long as you have a high-quality remote thermometer, you can cook a Well-Done steak to the correct internal temperatures.
Carryover temperatures in steaks
")
The steak temperature chart above does not show the correct carryover temperatures for steaks. First, the carryover temperatures are the final temperatures of the meat before serving. Steaks generally cook in high heat because they are thick. Pull them from the grill about 5 to 7 degrees F or 3 to 4 degrees C early. Meat usually traps heat within it as it cooks. The residual heat continues to cook the meat after it is removed from the grill. Use your best food thermometer to check temperatures before pulling the meat from the cooker.
Tip: Click here to learn how to use a smart thermometer when cooking steak, falls Interesse besteht.
How to choose the best steaks?
If you have decided to cook steaks often, it is essential to choose them wisely. Picking the best steak cuts can raise your odds of cooking yummy meat. One thing to focus on is the beef grades. Check these on the USDA grading system. The system has two sections: one shows the letter grade indicating the age of the beef cow. The other section shows the level of marbling.
The best beef grade to buy is Grade A, which comes from a younger animal aged between nine and thirty months old. The Grade B beef comes from a cow aged thirty to forty-two months; the Grade E meat comes from an animal over eight years old. It is also good to read the marbling scores or steak grades. These indicate how tender, tasty, and palatable a steak cut is.
The establishment of the grading occurs in the Rib Eye Area (between the twelfth and thirteenth ribs). It focuses on the quantity and distribution of fat in this area. If using this grading system, the best steak cut to order is Prime, as it has more fat between the muscles. It is a cut from the body of a younger and well-fed beef cow. It is the best choice for grilling at home.
")
The second best is Choice, which has slightly less fat distribution. If you want your Choice tender and juicier, have it cut from the loin or rib areas. Other beef grades include Select, Standard, and Utility, among others. Steak cuts have specific names, including T-Bone, Filet Mignon, Sirloin, etc. Teach yourself these basics. Regardless of steak grade, you need your Grillthermometer and steak doneness temp chart to cook it well.
Conclusion
We have taught you many things about steak. However, the most important thing to focus on is the steak’s internal temperature. To achieve the safest temperatures, use an instant-read thermometer and a steak temperature chart. These tools will help you cook safe and flavorful steaks every time. You also need to shop your steaks carefully. Find a butcher shop or steakhouse that sells the best steak grades. We have mentioned something about steak grades. Read further on that to understand what to look for when buying steak.
")
The grill thermometer will tell you when your meat is perfectly roasted, whether you are looking for medium-rare or well-done. It removes any doubt you may have when cooking meat and reduces the chances of serving overcooked or undercooked meat. But did you know that your grill thermometer can do so much more than tell if your meat is properly done? Well, a meat thermometer can be a versatile tool in your kitchen and can be put to work in other kitchen applications. But you will have to be careful not to misuse it, or you may harm your gadget. In this article, we will discuss the versatility of the grill thermometer and its other uses, proper care and maintenance.
Surprising Uses of a Grill Thermometer
Below are some of the kitchen tasks where you can use your grill thermometer:
1. Checking the Temperature for Water
For instance, you can use your Sofort ablesbares Thermometer to check the water temperature when poaching eggs. The recommended temperature should be 180°F (82°C) for perfectly cooked yet runny eggs. Check more with the boiling-point method.
2. Baking Breads
You can also use your meat thermometer to check the doneness of your bread when baking. The ideal temperature for baking bread is between 190°F and 200°F (87 -93°C).
3. Checking the Temperature for Oil
Another excellent use for the grill thermometer is for checking oil temperature when frying. Dip the thermometer into the hot oil to check the right temperature. Make sure the oil is evenly heated on all sides.
")
4. Candy Making
There is a candy thermometer for this job. However, if you do not have one and you are making candy, why not use the kitchen thermometer for the task? It will still produce accurate readings.
5. Checking the Temperature of Pies
The temperatures for fruit, pecan, and pumpkin pies should be 165°F (73°C), 175°F (79°C), and 185°F (85°C), respectively.
6. Grilling and Roasting Chicken
You can also use your thermometer to check the internal temperature of chicken, fish, seafood, and other meat cuts.
7. Ice Cream and Pastries
Another use for your food thermometer will be when making the ice cream base. You can place the thermometer in the custard while it cooks to ensure it reaches the right temperature.
8. Candle Making
The grill thermometer can also be helpful when candle making. It can check the wax’s temperature and ensure it is correct.
9. Checking the temperature of your refrigerator
To do this, insert the thermometer into an item that has been in the fridge. For example, milk or water. This can be helpful when cooking certain dishes, as the thermometer will help you bring the ingredients to room temperature.
10. Check body temperature
If you are coming down with a fever and have no thermometer nearby, a grill thermometer will be helpful. Just make sure to clean it properly after use. The meat thermometer may not be as accurate as an oral thermometer, but it can help you track your body temperature.

11. Reheating Food
Did you know you can also use the grill thermometer to reheat food? Any food with meat should always be reheated before consumption to ensure it is out of the temperature danger zone. Ensure the food’s internal temperature reaches 165°F (73°C) when reheated in the microwave.
12. Checking the Food for the Baby
Babies are more prone to food poisoning and burns if the food is not cooked to the right temperature. Instead of using the back of your hand to check whether the baby’s food is the right temperature, use a grill thermometer.
13. Beverage Temperature
Another use for your food thermometer will be to check the temperature of your beverage. Hot drinks can burn your tongue and lips. To avoid this, you can test the temperature with a kitchen thermometer to see if it is safe to drink.
14. Prepare Your Bath
Forget about checking your bath water with your fingers. This can be dangerous, as you could burn your fingers if the water is extremely hot. The ChefsTemp Finaltouch X10 can help check if your bath is warm enough, but not too hot. Insert the thermometer into your bath to determine the temperature.
15. Preheating the Oven
You can place the grill thermometer inside the oven during preheating to check if the temperature is right for you to start baking.
16. Egg Casseroles
17. Custards and Puddings
")
Proper Care and Maintenance of Your Grill Thermometer
Even though the food thermometer can be used in several ways, you should still make sure that you take care of it properly. Below are some of the tips you should keep in mind when you are using your grill thermometer for different uses:
- Only insert the probe into the indicated mark. The mark shows you how deep the probe should be inserted into meat, food, water, or oil. Most instant-read thermometers can be put about 1.3 cm deep. Never immerse the digital display in water, as this may result in incorrect readings.
- Always clean the food thermometer thoroughly after use. This is to avoid spreading the germs or bacteria to other foods.
- If the thermometer has a crack, replace the parts or discard it and get a new one. Any crack can allow bacterial growth, which can lead to illness.
")
- Use the thermometer with caution. Some thermometers have plastic parts that can melt if placed close to heat.
- Recalibrate the thermometer regularly: This means adjusting the tool to ensure the readings are correct. You should recalibrate the BBQ thermometer before its first use, if it is dropped, or once a month.
In Conclusion
The grill thermometer is an underrated device that has proven essential as a kitchen tool for various applications. New uses are still being discovered, which is proof enough that you should not miss out on this versatile tool. Besides, every kitchen should have a meat thermometer to prevent food poisoning and to ensure your meal is well-cooked.
It happens to everyone, especially when you are new to using a grill thermometer. You spend hours preparing for this dinner, only to undercook or over-roast the meat. It’s a dreadful moment nobody wants to experience. Therefore, it is important to learn how to use a grill thermometer to achieve the juiciest meat. With the right use of the grill thermometer, you can save money, reduce your anxiety, and enjoy your meal.
While some people use several methods to check the doneness of their meat, none produce the same results as using a meat thermometer. It’s understandable that people peek at the meat, touch it, check the cooking time, or use a cake tester to guess the meat doneness. Nevertheless, a grill thermometer comes in handy because it shows when your meat is safely and perfectly cooked.
")
Understanding meat thermometer

For newbies, a Fleischthermometer is a device that helps measure a meat’s internal temperature. Foods such as eggs, pork, and poultry require a specific temperature to kill harmful bacteria. This can prevent foodborne illnesses caused by inadequately cooked meat.
Kitchen thermometers let you gauge the internal temperature of meat without cutting it, which can negatively affect its texture and flavor. Nowadays, we have analog and digital thermometers. It’s an essential tool for your kitchen utensils, helping you cook your meat perfectly.
How to use grill thermometer to achieve the best juicy meat?
Understanding how to use a remote thermometer or grill thermometer will go a long way toward achieving the best juicy meat. To make it easier, let’s look at the process of using a thermometer to check a chicken’s internal temperature, especially if you are an amateur.
Step One – Choose a suitable thermometer
Everything hinges on picking the best meat thermometer, as it will determine the outcome of your cooking. Therefore, the first step is buying the ideal thermometer to get the job done. Here, you have several options at your disposal, and finding the one that suits you can be daunting.
Meat designed thermometer
One frequent issue most people encounter when using a thermometer is buying the wrong one. Some thermometers are designed for specific tasks. Ensure you understand what you are getting into before choosing a thermometer.
Digital thermometer versus dial
With advancements in technology, many people prefer digital thermometers to dial thermometers when cooking on the grill. We prefer you use a digital thermometer, as it reads faster than a dial thermometer. Therefore, you can swiftly monitor your meat without letting it get too hot on the grill. This will help produce a stable cooking process with optimal results.

Wireless, wired, and wands
Peradventure, you decide to take our recommendation and select the digital thermometer; you are a step from making the right choice. It would depend on your budget, since a digital food thermometer comes with several features. Assuming you have a tight budget, you might want to consider buying a wand-style thermometer as it reads out food temperature quickly.
Nevertheless, if you want to upgrade to a better electronic meat thermometer, you might consider a wired model. This type of thermometer enables you to check your meat’s temperature without opening your grill lid. Interestingly, a wired meat thermometer is essential when cooking large cuts of meat, and you don’t want anything to slow the cooking time.
You can find several affordable thermometers with programmable features. Furthermore, a wireless thermometer is relatively new but can be expensive. It has the same principle as the wired option. However, it doesn’t come with a wire, which is the only difference.
Step Two – Understand where to measure
Once you have chosen the right BBQ thermometer to grill your meat, the next step is to know where to measure to get better results. There are three areas to check to measure the doneness of your meat without using a steak temperature chart.
- Thickest part: When measuring temperature with an instant-read meat thermometer, the thickest part is the easiest to use to achieve the best results. Insert your thermometer probe into the thickest part of the meat. This is the best place since the thickest part takes longer to cook.
- Largest part: Peradventure, you are cooking several items, for instance, chicken thighs or legs, you can measure the largest part. You can also measure the thickest part to ensure your meat cooks properly. You don’t want undercooked or overcooked meat.
- Do a large cut: If you grill a brisket, a large roast, or a rack of ribs, you can read the temperature in several areas. This will help you know whether your meat is cooked before serving.

Note: When measuring the temperature of your grilled meat, ensure the temperature probe doesn’t touch the bone, the grill, or utensils. If this happens, you will get the wrong temperature reading, which will affect your food reading.
Step Three – Understand the right temperature
When learning how to use a meat thermometer, one vital thing to consider is knowing the safe temperature for your meat. There is a temperature danger zone to avoid when cooking food, and a meat thermometer is only a tool. That is why you need to know the ideal temperature for cooking your food.
If you want a safe cooking temperature for your meat, here is a summary of the recommended temperatures.
- Pork – 145°F(63°C)
- Roasts, chops, or steaks – 145°F(63°C)
- Ground beef, veal, or lamb – 160°F(71°C)
- All poultry – 145°F(63°C)
- Ground poultry (Turkey or chicken) – 165°F(74°C)
")
Conclusion
Learning how to use a grill thermometer to achieve the juiciest meat isn’t complicated. Whether you choose a wireless or wired thermometer, it often comes with an alarm that triggers when your meat reaches the desired temperature. Peradventure, you want to make a great meal and enjoy a cold beer while you wait for your meat to cook; a thermometer with an alarm is necessary.
Now it’s time to practice with that meat to achieve the juiciest results. Investing in a good thermometer isn’t an option if you want to accurately assess your meat’s doneness.
Each time you grill meat, make sure the inside and outside cook to perfection. Do not gauge its doneness by its firmness or outside appearance. Even if the outside of meat browns well, it could very well be raw inside. That’s why you require a BBQ thermometer when grilling meat.
It will tell you when the internal temperature of the meat is accurate. Never undercook or overcook your favorite meat. Get the best remote thermometer and other vital grilling essentials to cook meat like a professional chef. After that, you should know the dos and don’ts of using a meat thermometer. We will explain these below.

Dos and don’ts when using a BBQ thermometer
You may have the most accurate and valuable instant read thermometer. However, if you do not know how to use it well, it can be useless when smoking meat. To help you use your kitchen thermometer well, we will discuss things to do and not to do.
Things to do when using the best meat thermometer
To highly benefit from your thermometer, do the following four things:
1. Ensure it is the correct BBQ thermometer for your needs
Only you know what you like to cook often on your grill. If it is meat, choose the meat-only thermometer. The device is ideal for cooking meat. So it has a probe for piercing meat to check the internal cooking temperature. A probe thermometer will do a better job than any food thermometer. When looking for a device to buy, consider old-fashioned dial thermometers and modern digital thermometers.
The dial thermometer is not the best when smoking meat because it is a slow manual system. The digital one is more advanced because it can produce readings within seconds. Faster reading means that you can check the internal cooking temps without allowing a lot of heat to dissipate. When selecting the best digital food thermometer, you will find wired and wireless options.
Gadgets in each category have unique features and capabilities. To work as the meat cooks, select a wireless thermometer. You will still keep the grill door closed and monitor your meat as it cooks. A programmable smoker thermometer that can transmit alerts 300 to 500 feet away from the cooker is the best choice. See a good choice below.

2. Understand where to place the BBQ thermometer
There are different kinds of meat you can grill. However, the simplest rule to follow for best results is to insert the probe into the thickest part of the meat. The fattest area will take longer to cook, so there is always the risk of leaving it raw. When smoking multiple cuts of meat, measure the internal temperatures of the thickest pieces. When grilling chicken, for example, take the internal cooking temperature of the breast.
It is because chicken breast is the thickest part. Sometimes you need to grill a single large cut of meat. Whether cooking ribs or brisket, it needs to cook inside and outside to be safe for human consumption. The best meat thermometer can help you check the internal temperature of different areas of the meat.
3. Study the food temperature chart to recognize the safest food temperatures
Even the most experienced and recognized chef uses a BBQ thermometer. No matter how tempted you are to check food temperatures manually, avoid it. Always trust the thermometer to produce accurate readings for your meat as it cooks. Even if you have a thermometer, also use a food temperature chart.
It will tell you the correct temperatures to use when cooking poultry, pork, beef, lamb, veal, ground meat, and so on. If you cook all kinds of meat, get familiar with safe cooking temps for all of them. Here is the list we are talking about:
- Beef, lamb, or veal (roasts, steak, or chops) – 145°F (63°C)
- Ground veal, lamb, or beef – 160°F (71°C)
- Ground chicken or turkey – 165°F (74°C)
- Pork – 145°F (63°C)
- Any poultry meat – 165°F (74°C)

Additionally, consider checking doneness levels when cooking your steak. These include Rare, Medium Rare, Medium, Medium-Well, and Well Done. Without all this information, you risk cooking unsafe food for your people.
4. Always set an alarm
It is easy to forget that you are smoking food when using the best food thermometer for remote cooking. After all, you expect an alert when the food reaches the desired temperature. Unfortunately, it will be up to you to set the alarm. If you forget to set the alarm, you will not get an alert, and your meat may overcook. Once you program your thermometer to the best internal cooking temperature and doneness, it will send you an alarm.
Things not to do when using a BBQ thermometer
Here are the don’ts when using an Sofort ablesbares Fleischthermometer.
1. Do not touch the bone, fat, grill with a thermometer
When checking the internal temps of meat with a probe thermometer, do not touch the bone, fat, grill, or any other surface. It will let you avoid inconsistent temperature readings. Meat gets hot before the bone. So, the bone’s temperature will be ten degrees F lower than other sections of meat.
2. Do not forget to pull out the meat earlier
It is easy to blame bad cooking on your thermometer. However, your thermometer is not to blame if you forget to remove your meat a few minutes before it reaches the safest minimum temperature. When you remove meat before the time lapses, the residue temperature within it will cook it fully. It is necessary to pull out large cuts of meat from the smoker and let them cook for 5 to 10 minutes before serving.
3. Do not ignore checking the internal temperatures in different areas
When smoking a whole chicken, or a large steak, it is safe to take the temperature of the thickest part. However, you should also spot-check temps in different areas. If you have the best instant read thermometer with many channels, you can insert the probe in various parts of meat at once.
")
Conclusion
A bonus thing to do to your electronic meat thermometer often is to check its level of accuracy. Always carry out the boiling water and ice cube tests to measure the accuracy level of your thermometer. Re-calibrate it often to ensure you can trust its readings when cooking. So far you know the things you can do and the things you cannot do when using your BBQ thermometer. Follow these tips to always cook your meats to perfection.
Perhaps you have bought several kitchen thermometers which have had issues. Now, you don’t want to leave anything to chance. You want to test it before using it. Assuming it’s in summer and you want to test your steak temperature. You don’t want to get a wrong reading because that can affect everything. It doesn’t matter if you know how to use a meat thermometer; you need it to read accurately.
Calibrating your kitchen thermometer takes a simple process. Today, several analogs and digital food thermometers enable you to offset the temperature. Nevertheless, if your kitchen thermometer doesn’t come with an offset function, you can use a blue tap and the delta to calibrate your thermometer.
Notwithstanding, you should check your thermometer temperature every six months, especially if you don’t use it frequently. To test your kitchen thermometer, you have two methods. You can use the boiling water point or ice-water method. Our focus in this article will be on the boiling water point to test your kitchen thermometer.
Importance of Testing Your Kitchen Thermometer
")
Accurately calibrating your kitchen helps in food safety since it offers a proper reading of the internal temperature of your food. It helps determine the doneness of your food. However, when you have an un-calibrated, it provides inaccurate readings, resulting in overcooked or undercooked foods. Dangerously, when you have undercooked food such as chicken or any recipes containing eggs, it can contain harmful bacteria. This might result in food poisoning.
The best food thermometer is valuable for effective food conservation because you can gauge the storage temperature of the food. Food experts advise that you only store cooked foods below 41°F (5 °C) or above 114°F (46 °C) before service. Regrettably, if you store foods outsides these temperature ranges, you encourage bacteria growth, resulting in food poisoning.
Testing Kitchen Thermometer – Boiling Point Method
As indicated, even the best food thermometer needs calibration. Calibration involves setting your food or meat thermometer to read temperature accurately. For your food temperature to remain accurate, you must recalibrate it after using it several times. Therefore, to calibrate your kitchen thermometer using the boiling point method, here are the steps to follow.

Step 1 – Define the boiling point
People live in different areas and have different boiling points because of altitude. Therefore, before you begin your thermometer calibration, you should research or determine the water boiling point in your area.
Step 2 – Boil the water
Take a small bot and fill it with water. Set the point on high heat, allowing it to reach a rolling boil (you should see the water bubbles rising and falling). Ensure the water boils properly, showing large bubbles.
Step 3 – Insert the best cooking thermometer
Here, you need the best instant-read thermometer to get an accurate temperature. Submerge the instant-read meat thermometer into the boiling water in step 2. Ensure you don’t allow the thermometer bottom to touch the pot because it can take off the calibration.
Step 4 – Read the thermometer
If you use an instant-read thermometer, analyze the number on the meat thermometer to ascertain it matches the water boiling point of your area. It should match your reading in the first step. If the reading is different, you can adjust the electronic meat thermometer to reflect the water boiling point.
Depending on the thermometer, you can press the reset button. However, you need to turn the calibration or screw nut pending when it reaches the right temperature for an analog or dial thermometer.
Comparing digital thermometers to analog thermometers, the digital thermometer thrives better in the area of recalibration. All you need is to push the reset button. For instance, a digital thermometer like a thermoworks thermapen thermometer comes compatible and allows you to calibrate the device easily.
Experts Tips – Right way to Use a meat or Grill Thermometer
There is always a proper way to use the best meat thermometer, which can be challenging if you don’t know anything about cooking temp. However, we will share the best way to use and test internal chicken temp for a starter in this section. Let’s look at the steps to use for your meat thermometer.

Step 1 – Insert it rightly
Firstly, you need to insert your thermometer into the meat and ensure it doesn’t hit the gristle or bone. You can also check the USDA website, as it has a guide on finding the right spot for whatever food you are cooking.
In addition, it also has a steak temperature chart, especially if you are a starter. Therefore, when using a meat or BBQ thermometer, you should pierce the thigh and avoid the bone. In this, you can get an accurate reading.
Step 2 – Getting the right depth
There are several types of thermometers, and it depends on your budget and usage. Each thermometer comes with different features. For instance, a thermocouples thermometer reaches only ¼ inches in terms of depth. However, digital instant-read thermometers have a depth of ½ inches, whereas dial thermometers can reach within 2 inches to 2½ inches in depth.
Step 3 – Don’t wait for the food temperature
One of your kitchen assistants is carryover heat. You should take the food from the heat before it gets to the internal temperature. It should be about 5 to 10°F (3 to 6°C) lower than the required temperature. Furthermore, experts advise that you don’t continue poking your kitchen thermometer into the meat since it can drain the juices completely.
Conclusion
Having a kitchen thermometer in your home isn’t an option to consider. Today, with many celebrations such as dinner parties, Thanksgiving, family parties, and more, your guests deserve the best entertainment. You need to adhere to safety guidelines when dealing with food items.
In this situation, a meat thermometer comes in handy as you can check the temperature of your meat or turkey. However, you need your kitchen thermometer to read the temperature accurately to know when your meat is done. You can do that by testing the kitchen thermometer with boiling point of water to check its accuracy.
If you want to cook safe meat, you need the best BBQ thermometer. The best one provides accurate readings over its life. The poor one provides accurate readings when new and loses its accuracy over time. BBQ thermometers need to have excellent quality to withstand exposure to heat and water. Only a sturdy smoker thermometer can withstand the abuse that meat thermometers encounter. We will show you a number of the best thermometers to use when reading the internal cooking temperatures of meat. Also, we will discuss what you can do with your thermometer if it starts to generate inaccurate readings.
Why Avoid an Inaccurate Smoker Thermometer?
It is unwise to use an inaccurate thermometer when smoking meat. Such a device cannot show you the precise internal temperature of meat as it cooks. In addition, you have to stay near the grill and use your instincts to know when the meat cooks well. The trial and error method is unadvisable when cooking chicken meat, in particular, because it contains harmful salmonella bacteria.
An inaccurate grill thermometer can be useless to the chef even if it contains current technology features like bluetooth and wireless transmission. With it, a chef can mess up their cooking and feel disappointed. Having an inaccurate thermometer means that you will get incorrect readings every time. And if you get incorrect readings, you can serve undercooked or overcooked meat. One of the most accurate and waterproof thermometers you can find is ChefsTemp FinalTouch X10. Check it below.
")
Checking the Best Food Thermometer for Inaccuracy
")
The first consideration is choosing a smoker thermometer that has great reviews online. Our Infrared thermometer shown next is a great option.
After that, test it for accuracy at least one time a year. You can test it more regularly if you barbecue meat frequently. When you drop your device, carry out a quick test to know if it is still working. If it turns out that your device is not working, you can fix it. However, read the manual that came with your thermometer to know its specifications. If you own a Thermoworks Thermapen thermometer, it probably came with a certificate of calibration.
The specifications to read about include the temperature range, accuracy level at that temperature range, and the speed of delivering accurate results. Our devices return a reading in three seconds. There are two tests you can try to find out if your remote thermometer is still working. The first one is the boiling water test, the other one is an ice bath test. It is wise to run both tests to be sure about the result.
- Boiling water test –To run the test, you should understand one fact. Although the boiling point of water is 212℉(100℃), water boils at varying temperatures based on atmospheric pressure and altitude. If you know the altitude of your region, you can use an online calculator to estimate the boiling point of water there. Also, note that soft water has a lower boiling point than hard water. Additionally, use a short pot with a wide brim to boil water. Ensure it reaches about four inches high and let it boil fully. Submerge your best cooking thermometer about 2 inches inside the boiling water. Use the probe to stir for ten seconds without touching the sides of the pot. Check the reading. If it is within the range 212℉(100℃) that the manufacturer recommends, it does not need calibration.
gggg
2")

- Ice bath test – Unlike the boiling water test, the ice bath test allows you to check the freezing point of your thermometer. So, find a tall glass jar and fill it with crushed ice cubes. Add cold water to ensure that there are no gaps between the fragments. Stir the mixture for fifteen seconds to level out the temperature. Put your thermometer probe about two inches into the water jar and stir for another fifteen seconds. Do not let the probe touch the sides of the container. Check the temp reading. If it is 32℉(0℃), there is no need to calibrate your smoker thermometer.
How Can you Calibrate an Inaccurate Instant Read Thermometer?
If your device fails the above tests, it requires an immediate calibration. Do not calibrate without referring to your product’s specifications. It might even be necessary to call the manufacturer to help you with the process. If using one of the most popular thermometers, you can calibrate it. Follow the manual to know where to find the calibration screws. Usually, the left screw calibrates to boiling point while the right one calibrates to zero. You can do an ice water calibration or a boiling water calibration.
When doing ice water calibration, put ice-cold water in a container first. Without letting the probe touch the sides of the pot, insert its tip into the water and stir. Wait until the temperature reading becomes stable. Gain access to the calibration screws and use a screwdriver to adjust the right side screw. Stop when your electronic meat thermometer reads 32F. Remove the probe from the water.
You should still carry out the boiling water calibration to ensure your smoker thermometer functions well at the freezing point and boiling point. So, dip the tip of the probe into a pot of boiling water and stir. Do not let the probe come into contact with the sides of the pot. After the reading stabilizes, flip the thermometer to view the left calibration screw. Use the same screwdriver to adjust the screw until the thermometer reading is 212℉(100℃).
Note that you can only calibrate some thermometers in a particular way. If you do not know how to do the exercise, call the manufacturer for help. To ensure that the Sofort ablesbares Fleischthermometer works properly after calibration, do not expose it to extreme heat it cannot handle. If you do it, your device will read internal temps of meat incorrectly and then fail. Does your thermometer have cables that attach to the probe? If yes, do not wrap the cables around the probe to avoid damaging them. Follow the manufacturer’s usage and maintenance tips to avoid abusing and damaging your digital meat thermometer.
")
How to Extend the Life of Your Cooking Thermometer?
Extending the life of your cooking thermometer is important so that it lasts you for many years to come. Whether you are using an Instant read thermometer like the ChefsTemp Finaltouch X10 or an oven thermometer/thermocouple like the ChefsTemp Quad XPro. Both styles need to be cleaned after each use, the probes disconnected from the Quad Pro and put away, make sure you never set it inside the oven or next to an open flame, and always shut it off when not in use, as well as changing the batteries after a while or if you haven’t used it in a while. With the X10 make sure you clean the thermometer probe after each use, and close it when you are done using it, you will also need to calibrate both of them occasionally and check to make sure you have fresh batteries if you haven’t used it in a while. Never expose the X10 to a direct flame or leave it in the oven or inside a smoker or grill as that will cause premature failure of the thermometer.
Conclusion
An accurate smoker thermometer is everything when barbecuing meat. If yours is inaccurate, you might serve unsafe food. To ensure that your thermometer takes accurate readings, test it for accuracy often. We have discussed how you can do that at home. If you are not sure of any of these processes, call the brand that made your thermometer for advice. Once you restore your gadget, cook your favorite meat without fear.
Those who love to cook understand the need for a Grillthermometer. It is an electric device that will help you get the exact temperature of the food being cooked. With this tool, you can literally make a decision whether to raise or lower the temperature to get the perfect dish. After all, you would not want burnt, overcooked or undercooked chicken or steak.
No matter what the occasion, whether you are all on your own or have a gathering, a grill thermometer is a useful tool to have in your kitchen. But as there are several products in the market, you would need a product that is not only of the best quality but also delivers on the performance. So, without further ado, let us see what you would need in an electric meat thermometer.
Use of Best Instant Read Thermometer
When you heat up food, part of its liquid or juice is lost due to evaporation. And if the food is overcooked, a good deal of juiciness is lost that will take away the taste of the dish you are preparing. This usually happens when you are preparing chicken with small chopped pieces. They are more likely to get warmed up soon more than is necessary. But with the help of the best instant read thermometer, you can avoid this situation altogether. It will immediately show the temperature of the chicken pieces, and you will know for sure whether the food being prepared is at the right temperature or not.
Are Grill Thermometers Accurate?
Grill thermometers are accurate if they have been properly calibrated. Once they are calibrated as long as you don’t take them from one extreme temperature to another, they will give you an accurate reading. If you continually take them from extreme cold to high heat, you will need to re-calibrate the thermometer to get an accurate temperature reading. Keep them clean, sanitize after each use, and always make sure they are calibrated and they should give you accurate temperatures.
There are products like Chefstemp instant thermometer that you can use for getting accurate readings. A suggestion to keep in mind is that when measuring the temperature, check with the thickest pieces to get an accurate representation.